How to resize images using photoshop. Resizing images in photoshop is a quick and simple procedure. On this blog post we show each step required to resize images with photoshop. Consequently screen shots have been added to help simplify the tutorial.
Professional photographers love Photoshop as you can greatly enhance a photo or image using the fabulous features. Therefore you should at least get to know a little about post processing yourself.
While nothing can make a bad photo look good, Photoshop can make a good photo look great. Therefore you can do some amazing enhancements that will render your projects unique. Unfortunately, at first, Photoshop can be very confusing for the beginner. This is where our resize images tutorial can help.
Our website contains a collection of easy to follow tutorials that we apply to photographs to improve them where needed. Simply look under the Photoshop category to the left of screen to find more useful tutorials. How to resize images is easy and something you will do a lot of on your photograph journey. As a result, this tutorial will help you nicely.
We do not advocate over using Photoshop on most images, preferring to have them as natural as when taken. Certain manipulation of an image can greatly enhance the overall look of a photo, therefore bringing out tones and textures that were unseen before.
Our Photoshop tutorial folder will grow over time as we add more helpful tips. To kick start the Photoshop tutorial folder we show you how the pros resize images.
How to resize images
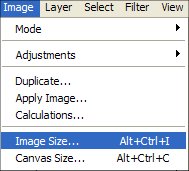
- Select image from the top tool bar.
- Scroll down and click Image Size
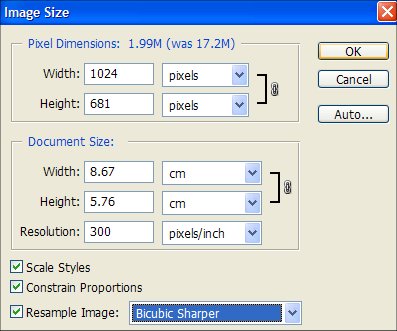
- First of all, type in the dimensions that you want for the resized image
- Check the Constrain Proportions box
- Finally hit the okay button.
- Your image will be resized and you can “save as” or continue working on the image.
Summary: How to Resize Images
- It is mostly better to work in pixels
- By having “Restrain Proportions” checked, you only need to change the width of the image. As a result of this, the height will be automatically adjusted in proportion.
- Selecting Bicubic Sharper actually sharpens the image pixels, consequently giving greater clarity to the project.
Sign-up for our online photography course and learn how to master your digital camera in easy to understand “at your own pace” lessons.
Click here for more information and sign-up details!

