When you photograph cascading water in rivers and creeks, it’s a lot of fun and the resulting images can be absolutely amazing. Yet you do need to be careful with swollen rivers and above all keep yourself and your expensive equipment safe.
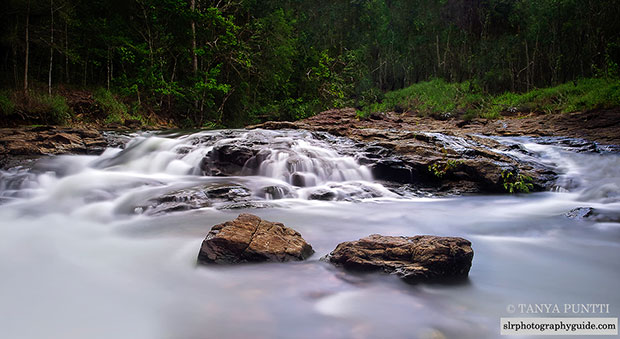
Listed below are our best photography tips for those wanting to photograph cascading water over rocks. We’ll share with you our equipment, camera settings and techniques for photographing beautiful landscapes, like the image shown below, using long exposures.
As a professional landscape photographer I am fortunate to live near beautiful rainforest mountains. Our tropical rainfall brings with it the perfect time for photographers to get out in nature and photograph cascading water of overflowing waterfalls and fast flowing creeks. The landscape shown above is one I shot yesterday and this is how I photographed it.
Time of day and quality of light matters
When it comes to long exposures, the darker the scenery the better. You’ll be able to set long shutter speeds and slow down water motion without overexposing the background.
You can’t get shots like this in sunny daylight weather conditions. Yes, you’ll be able to slow the water down, however everything surrounding the water will be highly overexposed and color will seem drab. So tip number 1 is to set your alarm early and awake before the sun rises.
This particular photo was taken very early in the morning on a cloudy overcast day. I’d also walked half an hour through rainforest. As you can imagine there was plenty of tree cover overhead darkening the landscape even further.
Due to overcast conditions, there was very little contrast between light and shade, with the general lighting being spread evenly. Several times the sun would move from behind a cloud and shine through the trees, creating harsh lighting on the scenery. During these times I’d stop shooting and enjoy the natural surroundings until it disappeared again.
It’s important when photographing landscapes or cascading water, to take notice of ever changing light.
Camera Gear
For this photograph I used a Canon 1DX coupled with a Canon EF 17-40mm f/4L USM Lens (my favorite landscape lens). My partner John used a Canon 5D Mark III and our technique and camera settings were the same.
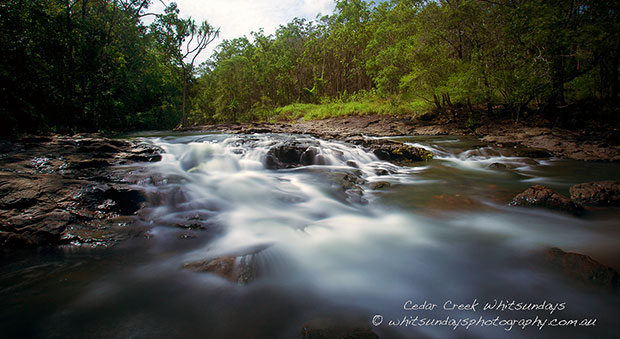
Here is one of John’s photos taken on the same photo shoot with his 5D Mark III + Canon EF 17-40mm f/4L USM Lens.
Even though the lighting conditions were already dark, we both used a Big Stopper from Lee Filters to help slow down the cascading water motion even further. A Big Stopper is a 10 stop neutral density filter. It’s basically a black piece of glass that is placed over the end of your lens that allows you to greatly extend the exposure times.
For example, if under normal exposures you’d set a shutter speed of 1/8th of a second, with a big stopper you’d set 2 minutes.
You can read more about neutral density filters over at https://www.leefilters.com/index.php/camera/bigstopper.
When setting long exposures it helps to use a sturdy tripod and a remote release. Also take at least 2 camera batteries, they drain quickly when shooting long exposures.
Camera Settings – Photograph Cascading Water
When photographing with a 10 stop neutral density filter I always set my camera to ‘Bulb’ mode. The longest shutter speed on most DSLRs using other modes is typically 30 seconds. I know this to be true of Canon and Nikon cameras. I’m sure others would be similar. Therefore if you want to shoot longer than 30 seconds, then ‘Bulb’ mode is the answer.
Bulb mode allows you to keep the shutter open for as long as your finger is on the remote release. The usual technique is to open the shutter by pressing the remote release, locking it in place. Use the timer on your camera, watch or iPhone to count the seconds, then release the remote to close the shutter.
Aperture – Depth of field
Personally I like to shoot these kinds of landscapes with a f/16 aperture. If I hadn’t used a neutral density filter, I would have set a much slower f/22 aperture which would create a slower exposure.
ISO Setting
Always use a 100 ISO camera setting when trying to slow down water motion. The lower the ISO, the slower the shutter speed. The slower the shutter speed, the slower the motion of the water.
Shutter Speed- Photograph Cascading Water
This is where it can get tricky. I often have other photographers ask me how do you know what shutter speed to set for slow motion water. The truth is, I can’t tell you the exact shutter speed to use. No two lighting situations are ever exactly the same! My 6am light here in North Queensland in Australia will no doubt be different to someone else’s over in Europe and vice versa.
Two overcast days can give off totally different light and hence require different shutter speeds. However it does help if you know how to shoot fully in manual mode and understand how to use your camera’s exposure line. That in itself will tell you what shutter speed to use when shooting landscapes without a neutral density filter. As soon as you add a neutral density filter, you need to increase the normal shutter speed.
For my shot of cascading water over rocks, I knew from experience that a 1 minute shutter speed would be a good starting point when using a 10 stop neutral density filter. Then give and take from there depending on the result as seen through my camera’s LCD screen. It took me 3 tries to get the exposure I was aiming for. Lee filters do come with a brochure that has numerous shutter speeds listed, however I usually only use this as a general guide.
Focus Point
For most landscapes I focus one third into the scenery. i.e. set a single focus point and use the very bottom point which is usually positioned one third into the scenery from the bottom of the frame.
File Format
I always shoot in RAW file format. It captures much more detail than jpeg or tiff. RAW also allows the photographer to change exposure, white balance and many other settings during post processing. Raw file format takes the stress out of having to get it right prior to taking the shot.
Picture Style (Canon) / Picture Control (Nikon)
I keep my picture style set to landscape when I photograph cascading water. I am after all taking a landscape photograph. I find the landscape picture control to be quite vivid. Skies are bluer and grass is greener when using this picture style. For this particular shot I didn’t adjust any other settings such as sharpness, color saturation or tone in camera. I find them unnecessary for slow motion water shots. For this composition much of the scenery was always going to be white. Hence my reasoning.
Simple tips on composition
I set my tripod on the same height level as the cascading water. What I see many beginners do is set the tripod up to match their own height so they don’t need to bend down for the shot. If I’d done that in this case, I’d have ended up with a composition that looks downward. An analogy would be the difference between photographing the top of a persons head or their face!
Getting low to take this shot, enabled me to use the trees as a beautiful background to the cascading water, in preference to the overcast sky above.
I hope this explains how I photographed this beautiful cascading water landscape image.
Sign-up for our online photography course and learn how to master your digital camera in easy to understand “at your own pace” lessons.
Click here for more information and sign-up details!

